How to fix "hidden symbol `__gcov_init' in ../libgcov.a(_gcov.o) is referenced by DSO"

Problem

When we introduced Gocv to build my project for code coverage, I encountered the following error message:

error 1

g++     -m64 -z muldefs -L/lib64 -L/usr/lib64 -lglib-2.0 -m64 -DUV_64PORT -DU2_64_BUILD -fPIC -g  DU_starter.o
NFA_msghandle.o NFA_svr_exit.o du_err_printf.o -L/workspace/code/myproject/src/home/x64debug/bin/
-L/workspace/code/myproject/src/home/x64debug/bin/lib/ -lundata -lutcallc_nfasvr
-Wl,-rpath=/workspace/code/myproject/src/home/x64debug/bin/ -Wl,-rpath=/.dulibs28 -Wl,--enable-new-dtags
-L/.dulibs28 -lodbc -lm -lncurses -lrt -lcrypt -lgdbm -ldl -lpam -lpthread -ldl -lglib-2.0
-lstdc++ -lnsl -lrt -lgcov -o /workspace/code/myproject/src/home/x64debug/objs/du/share/dutsvr
/usr/bin/ld: /workspace/code/myproject/src/home/x64debug/objs/du/share/dutsvr:
hidden symbol `__gcov_init' in /usr/lib/gcc/x86_64-redhat-linux/4.8.5/libgcov.a(_gcov.o) is referenced by DSO

error 2

It may also be such an error

/home/p7539c/cutest/CuTest.c:379: undefined reference to `__gcov_init'
CuTest.o:(.data+0x184): undefined reference to `__gcov_merge_add'

Positioning problem

Let’s take the error 1.

From the error message, I noticed -lundata -lutcallc_nfasvr are all the linked libraries (-llibrary)

I checked libraries undata and utcallc_nfasvr one by one, and found it displayed U __gcov_init and U means undefined symbols.

Use the find command to search the library and the nm command to list symbols in the library.

-sh-4.2$ find -name *utcallc_nfasvr*
./bin/libutcallc_nfasvr.so
./objs/du/work/libutcallc_nfasvr.so
-sh-4.2$ nm ./bin/libutcallc_nfasvr.so | grep __gcov_init
U __gcov_init

How to fix

In my case, I just added the following code LIB_1_LIBS := -lgcov to allow the utcallc_nfasvr library to call gcov.

LIB_1 := utcallc_nfasvr
# added below code to my makefile
LIB_1_LIBS := -lgcov

Rebuild, the error is gone, then checked library, it displayed t __gcov_init this time, it means symbol value exists not hidden.

-sh-4.2$ nm ./bin/libutcallc_nfasvr.so | grep __gcov_init
t __gcov_init

Or in your case may build a shared library like so, similarly, just add the compile parameter -lgcov

g++   -shared -o libMyLib.so src_a.o src_b.o src_c.o -lgcov

Summary

I have encountered the following problems many times

undefined reference to `__gcov_init'

undefined reference to `__gcov_merge_add'

`hidden symbol `__gcov_init' in /usr/lib/gcc/x86_64-redhat-linux/4.8.5/libgcov.a(_gcov.o) is referenced by DSO`

Each time I can fix it by adding -glcov then recompile. the error has gone after rebuild. (you use the nm command to double-check whether the symbol has been added successfully.)

Hopes it can help you.

Add or update Bitbucket build status with REST API

Backgorud

  1. When you want to add build status to your Bitbucket the specific commit of a branch when you start a build from the branch

  2. When the build status is wrong, you want to update it manually. for example, update build status from FAILED to SUCCESSFUL

You can call Bitbucket REST API to do these.

Code snippet

Below is the code snippet to update Bitbucket build status with REST API in the shell script.

The code on GitHub Gist: https://gist.github.com/shenxianpeng/bd5eddc5fb39e54110afb8e2e7a6c4fb

Click Read More to view the code here.

Read More

关于代码覆盖率 (About Code Coverage)

本篇简要介绍:什么是代码覆盖率?为什么要做代码覆盖率?代码覆盖率的指标、工作原理,主流的代码覆盖率工具以及不要高估代码覆盖率指标。

什么是代码覆盖率?

代码覆盖率是对整个测试过程中被执行的代码的衡量,它能测量源代码中的哪些语句在测试中被执行,哪些语句尚未被执行。

为什么要测量代码覆盖率?

众所周知,测试可以提高软件版本的质量和可预测性。但是,你知道你的单元测试甚至是你的功能测试实际测试代码的效果如何吗?是否还需要更多的测试?

这些是代码覆盖率可以试图回答的问题。总之,出于以下原因我们需要测量代码覆盖率:

  • 了解我们的测试用例对源代码的测试效果
  • 了解我们是否进行了足够的测试
  • 在软件的整个生命周期内保持测试质量

注:代码覆盖率不是灵丹妙药,覆盖率测量不能替代良好的代码审查和优秀的编程实践。

通常,我们应该采用合理的覆盖目标,力求在代码覆盖率在所有模块中实现均匀覆盖,而不是只看最终数字的是否高到令人满意。

举例:假设代码覆盖率只在某一些模块代码覆盖率很高,但在一些关键模块并没有足够的测试用例覆盖,那样虽然代码覆盖率很高,但并不能说明产品质量就很高。

代码覆盖率的指标种类

代码覆盖率工具通常使用一个或多个标准来确定你的代码在被自动化测试后是否得到了执行,常见的覆盖率报告中看到的指标包括:

  • 函数覆盖率:定义的函数中有多少被调用
  • 语句覆盖率:程序中的语句有多少被执行
  • 分支覆盖率:有多少控制结构的分支(例如if语句)被执行
  • 条件覆盖率:有多少布尔子表达式被测试为真值和假值
  • 行覆盖率:有多少行的源代码被测试过

代码覆盖率是如何工作的?

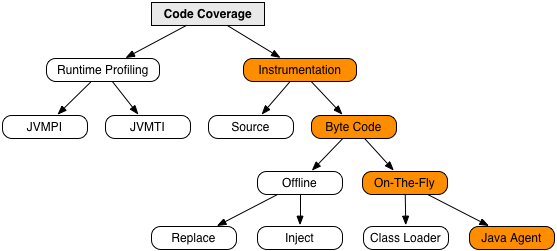
代码覆盖率测量主要有以下三种方式:

1. Source code instrumentation - 源代码检测

将检测语句添加到源代码中,并使用正常的编译工具链编译代码以生成检测的程序集。这是我们常说的插桩,Gcov 是属于这一类的代码覆盖率工具。

2. Runtime instrumentation - 运行时收集

这种方法在代码执行时从运行时环境收集信息以确定覆盖率信息。以我的理解 JaCoCo 和 Coverage 这两个工具的原理属于这一类别。

3. Intermediate code instrumentation - 中间代码检测

通过添加新的字节码来检测编译后的类文件,并生成一个新的检测类。说实话,我 Google 了很多文章并找到确定的说明哪个工具是属于这一类的。

了解这些工具的基本原理,结合现有的测试用例,有助于正确的选择代码覆盖率工具。比如:

  • 产品的源代码只有 E2E(端到端)测试用例,通常只能选择第一类工具,即通过插桩编译出的可执行文件,然后进行测试和结果收集。
  • 产品的源代码有单元测试用例,通常选择第二类工具,即运行时收集。这类工具的执行效率高,易于做持续集成。

当前主流代码覆盖率工具

代码覆盖率的工具有很多,以下是我用过的不同编程语言的代码覆盖率工具。在选择工具时,力求去选择那些开源、流行(活跃)、好用的工具。

编程语言 代码覆盖率工具
C/C++ Gcov
Java JaCoCo
JavaScript Istanbul
Python Coverage.py
Golang cover

不要高估代码覆盖率指标

代码覆盖率不是灵丹妙药,它只是告诉我们有哪些代码没有被测试用例“执行到”而已,高百分比的代码覆盖率不等于高质量的有效测试。

首先,高代码覆盖率不足以衡量有效测试。相反,代码覆盖率更准确地给出了代码未被测试程度的度量。这意味着,如果我们的代码覆盖率指标较低,那么我们可以确定代码的重要部分没有经过测试,然而反过来不一定正确。具有高代码覆盖率并不能充分表明我们的代码已经过充分测试。

其次,100% 的代码覆盖率不应该是我们明确努力的目标之一。这是因为在实现 100% 的代码覆盖率与实际测试重要的代码之间总是需要权衡。虽然可以测试所有代码,但考虑到为了满足覆盖率要求而编写更多无意义测试的趋势,当你接近此限制时,测试的价值也很可能会减少。

借 Martin Fowler 在这篇测试覆盖率的文章说的一句话:

代码覆盖率是查找代码库中未测试部分的有用工具,然而它作为一个数字说明你的测试有多好用处不大。

参考

https://www.lambdatest.com/blog/code-coverage-vs-test-coverage/
https://www.atlassian.com/continuous-delivery/software-testing/code-coverage
https://www.thoughtworks.com/insights/blog/are-test-coverage-metrics-overrated

Code coverage testing of C/C++ projects using Gcov and LCOV

This article shares how to use Gcov and LCOV to metrics code coverage for C/C++ projects.
If you want to know how Gcov works, or you need to metrics code coverage for C/C++ projects later,
I hope this article is useful to you.

Problems

The problem I’m having: A C/C++ project from decades ago has no unit tests, only regression tests,
but you want to know what code is tested by regression tests? Which code is untested?
What is the code coverage? Where do I need to improve automated test cases in the future?

Can code coverage be measured without unit tests? Yes.

Code coverage tools for C/C++

There are some tools on the market that can measure the code coverage of black-box testing,
such as Squish Coco, Bullseye, etc. Their principle is to insert instrumentation when build product.

I’ve done some research on Squish Coco,
because of some unresolved compilation issues that I didn’t buy a license for this expensive tool.

When I investigated code coverage again, I found out that GCC has a built-in code coverage tool called
Gcov.

Prerequisites

For those who want to use Gcov, to illustrate how it works, I have prepared a sample program that
requires GCC and LCOV to be installed before running the program.

If you don’t have an environment or don’t want to install it, you can check out this example
repository

Note: The source code is under the master branch master, and code coverage result html under branch coverage.

# This is the version of GCC and lcov on my test environment.
sh-4.2$ gcc --version
gcc (GCC) 4.8.5 20150623 (Red Hat 4.8.5-39)
Copyright (C) 2015 Free Software Foundation, Inc.
This is free software; see the source for copying conditions. There is NO
warranty; not even for MERCHANTABILITY or FITNESS FOR A PARTICULAR PURPOSE.

sh-4.2$ lcov -v
lcov: LCOV version 1.14

How Gcov works

Gcov workflow diagram

flow

There are three main steps:

  1. Adding special compilation options to the GCC compilation to generate the executable, and *.gcno.
  2. Running (testing) the generated executable, which generates the *.gcda data file.
  3. With *.gcno and *.gcda, generate the gcov file from the source code, and finally generate the code coverage report.

Here’s how each of these steps is done exactly.

1. Compile

The first step is to compile. The parameters and files used for compilation are already written in the makefile.

make build
Click to see the output of the make command
sh-4.2$ make build
gcc -fPIC -fprofile-arcs -ftest-coverage -c -Wall -Werror main.c
gcc -fPIC -fprofile-arcs -ftest-coverage -c -Wall -Werror foo.c
gcc -fPIC -fprofile-arcs -ftest-coverage -o main main.o foo.o

As you can see from the output, this program is compiled with two compile options -fprofile-arcs and -ftest-coverage.
After successful compilation, not only the main and .o files are generated, but also two .gcno files are generated.

The .gcno record file is generated after adding the GCC compile option -ftest-coverage, which contains information
for reconstructing the base block map and assigning source line numbers to blocks during the compilation process.

2. Running the executable

After compilation, the executable main is generated, which is run (tested) as follows

./main
Click to see the output when running main
sh-4.2$ ./main
Start calling foo() ...
when num is equal to 1...
when num is equal to 2...

When main is run, the results are recorded in the .gcda data file, and if you look in the current directory,
you can see that two .gcda files have been generated.

$ ls
foo.c foo.gcda foo.gcno foo.h foo.o img main main.c main.gcda main.gcno main.o makefile README.md

.gcda record data files are generated because the program is compiled with the -fprofile-arcs option introduced.
It contains arc transition counts, value distribution counts, and some summary information.

3. Generating reports

make report
Click to see the output of the generated report
sh-4.2$ make report
gcov main.c foo.c
File 'main.c'
Lines executed:100.00% of 5
Creating 'main.c.gcov'

File 'foo.c'
Lines executed:85.71% of 7
Creating 'foo.c.gcov'

Lines executed:91.67% of 12
lcov --capture --directory . --output-file coverage.info
Capturing coverage data from .
Found gcov version: 4.8.5
Scanning . for .gcda files ...
Found 2 data files in .
Processing foo.gcda
geninfo: WARNING: cannot find an entry for main.c.gcov in .gcno file, skipping file!
Processing main.gcda
Finished .info-file creation
genhtml coverage.info --output-directory out
Reading data file coverage.info
Found 2 entries.
Found common filename prefix "/workspace/coco"
Writing .css and .png files.
Generating output.
Processing file gcov-example/main.c
Processing file gcov-example/foo.c
Writing directory view page.
Overall coverage rate:
lines......: 91.7% (11 of 12 lines)
functions..: 100.0% (2 of 2 functions)

Executing make report to generate an HTML report actually performs two main steps behind this command.

  1. With the .gcno and .gcda files generated at compile and run time, execute the command
    gcov main.c foo.c to generate the .gcov code coverage file.

  2. With the code coverage .gcov file, generate a visual code coverage report via
    LCOV.

The steps to generate the HTML result report are as follows.

# 1. Generate the coverage.info data file
lcov --capture --directory . --output-file coverage.info
# 2. Generate a report from this data file
genhtml coverage.info --output-directory out

Delete all generated files

All the generated files can be removed by executing make clean command.

Click to see the output of the make clean command
sh-4.2$ make clean
rm -rf main *.o *.so *.gcno *.gcda *.gcov coverage.info out

Code coverage report

index

The home page is displayed in a directory structure

example

After entering the directory, the source files in that directory are displayed

main.c

The blue color indicates that these statements are overwritten

foo.c

Red indicates statements that are not overridden

LCOV supports statement, function, and branch coverage metrics.

Side notes:

There is another tool for generating HTML reports called gcovr, developed in Python,
whose reports are displayed slightly differently from LCOV. For example, LCOV displays it in a directory structure,
while gcovr displays it in a file path, which is always the same as the code structure, so I prefer to use the former.

How to make Jenkins job fail after timeout? (Resolved)

I’ve run into some situations when the build fails, perhaps because some processes don’t finish, and even setting a timeout doesn’t make the Jenkins job fail.

So, to fix this problem, I used try .. catch and error to make my Jenkins job failed, hopes this also helps you.

Please see the following example:

pipeline {
agent none
stages {
stage('Hello') {
steps {
script {
try {
timeout(time: 1, unit: 'SECONDS') {
echo "timeout step"
sleep 2
}
} catch(err) {
// timeout reached
println err
echo 'Time out reached.'
error 'build timeout failed'
}
}
}
}
}
}

Here is the output log

00:00:01.326  [Pipeline] Start of Pipeline
00:00:01.475 [Pipeline] stage
00:00:01.478 [Pipeline] { (Hello)
00:00:01.516 [Pipeline] script
00:00:01.521 [Pipeline] {
00:00:01.534 [Pipeline] timeout
00:00:01.534 Timeout set to expire in 1 sec
00:00:01.537 [Pipeline] {
00:00:01.547 [Pipeline] echo
00:00:01.548 timeout step
00:00:01.555 [Pipeline] sleep
00:00:01.558 Sleeping for 2 sec
00:00:02.535 Cancelling nested steps due to timeout
00:00:02.546 [Pipeline] }
00:00:02.610 [Pipeline] // timeout
00:00:02.619 [Pipeline] echo
00:00:02.621 org.jenkinsci.plugins.workflow.steps.FlowInterruptedException
00:00:02.625 [Pipeline] echo
00:00:02.627 Time out reached.
00:00:02.630 [Pipeline] error
00:00:02.638 [Pipeline] }
00:00:02.656 [Pipeline] // script
00:00:02.668 [Pipeline] }
00:00:02.681 [Pipeline] // stage
00:00:02.696 [Pipeline] End of Pipeline
00:00:02.709 ERROR: build timeout failed
00:00:02.710 Finished: FAILURE

解决在 AIX 上 Git Clone 失败的两个问题

前言

本篇记录两个在做 Jenkins 与 AIX 做持续集成得时候遇到的 Git clone 代码失败的问题,并已解决,分享出来或许能有所帮助。

  1. Dependent module /usr/lib/libldap.a(libldap-2.4.so.2) could not be loaded.
  2. 通过 SSH 进行 git clone 出现 Authentication failed

问题1:Dependent module /usr/lib/libldap.a(libldap-2.4.so.2) could not be loaded

Jenkins 通过 HTTPS 来 checkout 代码的时候,出现了如下错误:

[2021-06-20T14:50:25.166Z] ERROR: Error cloning remote repo 'origin'
[2021-06-20T14:50:25.166Z] hudson.plugins.git.GitException: Command "git fetch --tags --force --progress --depth=1 -- https://git.company.com/scm/vas/db.git +refs/heads/*:refs/remotes/origin/*" returned status code 128:
[2021-06-20T14:50:25.166Z] stdout:
[2021-06-20T14:50:25.166Z] stderr: exec(): 0509-036 Cannot load program /opt/freeware/libexec64/git-core/git-remote-https because of the following errors:
[2021-06-20T14:50:25.166Z] 0509-150 Dependent module /usr/lib/libldap.a(libldap-2.4.so.2) could not be loaded.
[2021-06-20T14:50:25.166Z] 0509-153 File /usr/lib/libldap.a is not an archive or
[2021-06-20T14:50:25.166Z] the file could not be read properly.
[2021-06-20T14:50:25.166Z] 0509-026 System error: Cannot run a file that does not have a valid format.
[2021-06-20T14:50:25.166Z]
[2021-06-20T14:50:25.166Z] at org.jenkinsci.plugins.gitclient.CliGitAPIImpl.launchCommandIn(CliGitAPIImpl.java:2450)
[2021-06-20T14:50:25.166Z] at org.jenkinsci.plugins.gitclient.CliGitAPIImpl.launchCommandWithCredentials(CliGitAPIImpl.java:2051)
[2021-06-20T14:50:25.166Z] at org.jenkinsci.plugins.gitclient.CliGitAPIImpl.access$500(CliGitAPIImpl.java:84)
[2021-06-20T14:50:25.167Z] at org.jenkinsci.plugins.gitclient.CliGitAPIImpl$1.execute(CliGitAPIImpl.java:573)
[2021-06-20T14:50:25.167Z] at org.jenkinsci.plugins.gitclient.CliGitAPIImpl$2.execute(CliGitAPIImpl.java:802)
[2021-06-20T14:50:25.167Z] at org.jenkinsci.plugins.gitclient.RemoteGitImpl$CommandInvocationHandler$GitCommandMasterToSlaveCallable.call(RemoteGitImpl.java:161)
[2021-06-20T14:50:25.167Z] at org.jenkinsci.plugins.gitclient.RemoteGitImpl$CommandInvocationHandler$GitCommandMasterToSlaveCallable.call(RemoteGitImpl.java:154)
..........................
[2021-06-20T14:50:25.167Z] Suppressed: hudson.remoting.Channel$CallSiteStackTrace: Remote call to aix-devasbld-01
[2021-06-20T14:50:25.167Z] at hudson.remoting.Channel.attachCallSiteStackTrace(Channel.java:1800)
..........................
[2021-06-20T14:50:25.168Z] at java.lang.Thread.run(Thread.java:748)
[2021-06-20T15:21:20.525Z] Cloning repository https://git.company.com/scm/vas/db.git

但是直接在虚拟机上通过命令 git clone https://git.company.com/scm/vas/db.git ,可以成功下载,没有出现任何问题。

  • 如果将 LIBPATH 设置为 LIBPATH=/usr/lib 就能重现上面的错误,这说明通过 Jenkins 下载代码的时候它是去 /usr/lib/ 下面找 libldap.a
  • 如果将变量 LIBPATH 设置为空 export LIBPATH=unset LIBPATH,执行 git clone https://... 就正常了。

尝试在 Jenkins 启动 agent 的时候修改 LIBPATH 变量设置为空,但都不能解决这个问题,不明白为什么不行!?

那就看看 /usr/lib/libldap.a 是什么问题了。

# ldd 的时候发现这个静态库有问题
$ ldd /usr/lib/libldap.a
/usr/lib/libldap.a needs:
/opt/IBM/ldap/V6.4/lib/libibmldapdbg.a
/usr/lib/threads/libc.a(shr.o)
Cannot find libpthreads.a(shr_xpg5.o)
/opt/IBM/ldap/V6.4/lib/libidsldapiconv.a
Cannot find libpthreads.a(shr_xpg5.o)
Cannot find libc_r.a(shr.o)
/unix
/usr/lib/libcrypt.a(shr.o)
Cannot find libpthreads.a(shr_xpg5.o)
Cannot find libc_r.a(shr.o)

# 可以看到它链接到是 IBM LDAP
$ ls -l /usr/lib/libldap.a
lrwxrwxrwx 1 root system 35 Jun 10 2020 /usr/lib/libldap.a -> /opt/IBM/ldap/V6.4/lib/libidsldap.a

# 再看看同样的 libldap.a 在 /opt/freeware/lib/ 是没问题的
$ ldd /opt/freeware/lib/libldap.a
ldd: /opt/freeware/lib/libldap.a: File is an archive.

$ ls -l /opt/freeware/lib/libldap.a
lrwxrwxrwx 1 root system 13 May 27 2020 /opt/freeware/lib/libldap.a -> libldap-2.4.a

问题1:解决办法

# 尝试替换
# 先将 libldap.a 重名为 libldap.a.old(不删除以防需要恢复)
$ sudo mv /usr/lib/libldap.a /usr/lib/libldap.a.old
# 重新链接
$ sudo ln -s /opt/freeware/lib/libldap.a /usr/lib/libldap.a
$ ls -l /usr/lib/libldap.a
lrwxrwxrwx 1 root system 27 Oct 31 23:27 /usr/lib/libldap.a -> /opt/freeware/lib/libldap.a

重新链接完成后,重新连接 AIX agent,再次执行 Jenkins job 来 clone 代码,成功了!

问题2:通过 SSH 进行 git clone 出现 Authentication failed

由于 AIX 7.1-TL4-SP1 即将 End of Service Pack Support,因此需要升级。但是升级到 AIX 7.1-TL5-SP6 后无法通过 SSH 下载代码。

$ git clone ssh://git@git.company.com:7999/vas/db.git
Cloning into 'db'...
Authentication failed.
fatal: Could not read from remote repository.

Please make sure you have the correct access rights
and the repository exists.

像这样的错误,在使用 Git SSH 方式来 clone 代码经常会遇到,通常都是没有设置 public key。只要执行 ssh-keygen -t rsa -C your@email.com 生成 id_rsa keys,然后将 id_rsa.pub 的值添加到 GitHub/Bitbucket/GitLab 的 public key 中一般就能解决。

但这次不一样,尽管已经设置了 public key,但错误依旧存在。奇快的是之前 AIX 7.1-TL4-SP1 是好用的,升级到 AIX 7.1-TL5-SP6 就不好用了呢?

使用命令 ssh -vvv <git-url> 来看看他们在请求 git 服务器时候 debug 信息。

# AIX 7.1-TL4-SP1
bash-4.3$ oslevel -s
7100-04-01-1543
bash-4.3$ ssh -vvv git.company.com
OpenSSH_6.0p1, OpenSSL 1.0.1e 11 Feb 2013
debug1: Reading configuration data /etc/ssh/ssh_config
debug1: Failed dlopen: /usr/krb5/lib/libkrb5.a(libkrb5.a.so): 0509-022 Cannot load module /usr/krb5/lib/libkrb5.a(libkrb5.a.so).
0509-026 System error: A file or directory in the path name does not exist.

debug1: Error loading Kerberos, disabling Kerberos auth.
.......
.......
ssh_exchange_identification: read: Connection reset by peer
# New machine AIX 7.1-TL5-SP6
$ oslevel -s
7100-05-06-2015
$ ssh -vvv git.company.com
OpenSSH_7.5p1, OpenSSL 1.0.2t 10 Sep 2019
debug1: Reading configuration data /etc/ssh/ssh_config
debug1: Failed dlopen: /usr/krb5/lib/libkrb5.a(libkrb5.a.so): 0509-022 Cannot load module /usr/krb5/lib/libkrb5.a(libkrb5.a.so).
0509-026 System error: A file or directory in the path name does not exist.

debug1: Error loading Kerberos, disabling Kerberos auth.
.......
.......
ssh_exchange_identification: read: Connection reset by peer

可以看到的差别是 OpenSSH 的版本不同,可能是因此导致的,根据这个推测很快就找到了类似的问题和答案(Stackoverflow 链接)

问题2:解决办法

~/.ssh/config 文件里添加选项 AllowPKCS12keystoreAutoOpen no

但问题又来了,这个选项是 AIX 上的一个定制选项,在 Linux 上是没有的。

这会导致同一个域账户在 AIX 通过 SSH 可以 git clone 成功,但在 Linux 上 git clone 会失败。

# Linux 上不识别改选项
stderr: /home/****/.ssh/config: line 1: Bad configuration option: allowpkcs12keystoreautoopen
/home/****/.ssh/config: terminating, 1 bad configuration options
fatal: Could not read from remote repository.
  1. 如果 config 文件可以支持条件选项就好了,即当为 AIX 是添加选项 AllowPKCS12keystoreAutoOpen no,其他系统则没有该选项。可惜 config 并不支持。
  2. 如果能单独的设置当前 AIX 的 ssh config 文件就好了。尝试将 /etc/ssh/ssh_config 文件修改如下,重启服务,再次通过 SSH clone,成功~!
Host *
AllowPKCS12keystoreAutoOpen no
# ForwardAgent no
# ForwardX11 no
# RhostsRSAAuthentication no
# RSAAuthentication yes
# PasswordAuthentication yes
# HostbasedAuthentication no
# GSSAPIAuthentication no
# GSSAPIDelegateCredentials no
# GSSAPIKeyExchange no
# GSSAPITrustDNS no
# ....省略

通过解除文件资源限制:解决在 AIX 使用 Git 下载大容量仓库失败问题

最近使用 AIX 7.1 从 Bitbucket 下载代码的时候遇到了这个错误:

fatal: write error: A file cannot be larger than the value set by ulimit.

$ git clone -b dev https://<username>:<password>@git.company.com/scm/vmcc/opensrc.git --depth 1
Cloning into 'opensrc'...
remote: Counting objects: 2390, done.
remote: Compressing objects: 100% (1546/1546), done.
fatal: write error: A file cannot be larger than the value set by ulimit.
fatal: index-pack failed

在 AIX 7.3 我遇到的是这个错误:

fatal: fetch-pack: invalid index-pack output

$ git clone -b dev https://<username>:<password>@git.company.com/scm/vmcc/opensrc.git --depth 1
Cloning into 'opensrc'...
remote: Counting objects: 2390, done.
remote: Compressing objects: 100% (1546/1546), done.
fatal: write error: File too large68), 1012.13 MiB | 15.38 MiB/s
fatal: fetch-pack: invalid index-pack output

这是由于这个仓库里的文件太大,超过了 AIX 对于用户文件资源使用的上限。

通过 ulimit -a 可以来查看。更多关于 ulimit 命令的使用 ulimit Command

$ ulimit -a
time(seconds) unlimited
file(blocks) 2097151
data(kbytes) unlimited
stack(kbytes) 32768
memory(kbytes) 32768
coredump(blocks) 2097151
nofiles(descriptors) 2000
threads(per process) unlimited
processes(per user) unlimited

可以看到 file 有一个上限值 2097151。如果将它也改成 unlimited 应该就好了。

通过 root 用户可以访问到 limits 文件 /etc/security/limits(普通用户没权限访问)。

# 以下是这个文件里的部分内容

default:
fsize = 2097151
core = 2097151
cpu = -1
data = -1
rss = 65536
stack = 65536
nofiles = 2000

将上述的值 fsize = 2097151 改成 fsize = -1 就将解除了文件块大小的限制了。修改完成后,重新登录来让这次修改生效。

再次执行 ulimit -a,已经生效了。

$ ulimit -a
time(seconds) unlimited
file(blocks) unlimited
data(kbytes) unlimited
stack(kbytes) 32768
memory(kbytes) 32768
coredump(blocks) 2097151
nofiles(descriptors) 2000
threads(per process) unlimited
processes(per user) unlimited

此时 file(blocks) 已经变成 unlimited 了。再次尝试 git clone

git clone -b dev https://<username>:<password>@git.company.com/scm/vmcc/opensrc.git --depth 1
Cloning into 'opensrc'...
remote: Counting objects: 2390, done.
remote: Compressing objects: 100% (1546/1546), done.
remote: Total 2390 (delta 763), reused 2369 (delta 763)
Receiving objects: 100% (2390/2390), 3.80 GiB | 3.92 MiB/s, done.
Resolving deltas: 100% (763/763), done.
Checking out files: 100% (3065/3065), done.

这次就成功了!

关于 Artifactory 上传制品变得非常缓慢,偶尔失败的问题分享

最近在我使用 Artifactory Enterprise 遇到了上传制品非常缓慢的问题,在经过与 IT,Artifactory 管理员一起合作终于解决这个问题,在此分享一下这个问题的解决过程。

如果你也遇到类似或许有所帮助。

问题描述

最近发现通过 Jenkins 往 Artifactory 里上传制品的时候偶尔出现上传非常缓慢的情况,尤其是当一个 Jenkins stage 里有多次上传,往往会在第二次上传的时候出现传输速度极为缓慢(KB/s )。

问题排查和解决

我的构建环境和 Jenkins 都没有任何改动,所有的构建任务都出现了上传缓慢的情况,为了排除可能是使用 Artifactory plugin 的导致原因,通过 curl 命令来进行上传测试,也同样上传速度经常很慢。

那么问题就在 Artifactory 上面。

  1. 是 Artifactory 最近升级了?
  2. 还是 Artifactory 最近修改了什么设置?
  3. 也许是 Artifactory 服务器的问题?

在跟 Artifactory 管理员进行了沟通之后,排除了以上 1,2 的可能。为了彻底排除是 Artifactory 的问题,通过 scp 进行拷贝的时候同样也出现了传输速度非常慢的情况,这问题就出现在网络上了。

这样需要 IT 来帮助排查网络问题了,最终 IT 建议更换网卡进行尝试(因为他们之前有遇到类似的情况),但这种情况会有短暂的网络中断,不过最终还是得到了管理者的同意。

幸运的是在更换网卡之后,Jenkins 往 Artifactory 传输制品的速度恢复了正常。

总结

处理次事件的一点点小小的总结:

由于这个问题涉及到几个团队,为了能够快速推进,此时明确说明问题,推测要有理有据,以及该问题导致了什么样的严重后果(比如影响发布)才能让相关人重视起来,否则大家都等着,没人回来解决问题。

当 Artifactory 管理推荐使用其他数据中心 instance,建议他们先尝试更换网卡;如果问题没有得到解决,在同一个数据中心创建另外一台服务器。如果问题还在,此时再考虑迁移到其他数据中心instance。这大大减少了作为用户去试错所带来的额外工作量。

Resolved problem that ESlint HTML report is not displayed correctly in Jenkins job

I’m just documenting to myself that it was solved by following.

When I want to integrate the ESlint report with Jenkins. I encourage a problem

That is eslint-report.html display different with it on my local machine, and I also log to Jenkins server and grab the eslint-report.html to local, it works well.

I used HTML Publisher plugin to display the HTML report, but only the ESlint HTML report has problems other report work well, so I guess this problem may be caused by Jenkins.

Finally, I find it. (Stackoverflow URL)

Follow the below steps for solution

  1. Open the Jenkin home page.
  2. Go to Manage Jenkins.
  3. Now go to Script Console.
  4. And in that console paste the below statement and click on Run.
System.setProperty("hudson.model.DirectoryBrowserSupport.CSP", "")
  1. After that, it will load CSS and JS.

According to Jenkins’s new Content Security Policy and I saw No frames allowed.

That is exactly the error I get on chrome by right-clicking on Elements.

Git 常见设置指北

在使用 Git 提交代码之前,建议做以下这些设置。

叫指南有点夸张,因为它在有些情况下下不适用,比如你已经有了 .gitattributes.editorconfig 等文件,那么有些设置就不用做了。

因此暂且叫他指北吧,它通常情况下还是很有用的。

废话不多说,看看都需要哪些设置吧。

1. 配置 name 和 email

# 注意,你需要将下面示例中我的 name 和 email 换成你自己的
$ git config --global user.name "shenxianpeng"
$ git config --global user.email "xianpeng.shen@gmail.com"

对于,我还推荐你设置头像,这样方便同事间的快速识别。

当你不设置头像的时候,只有把鼠标放到头像上才知道 Pull Request 的 Reviewers 是谁(来自于Bitubkcet)。

Bitbucket头像

2. 设置 core.autocrlf=false

为了防止 CRLF(windows) 和 LF(UNIX/Linux/Mac) 的转换问题。为了避免在使用 Git 提交代码时出现历史被掩盖的问题,强烈建议每个使用 Git 的人执行以下命令

$ git config --global core.autocrlf false
# 检查并查看是否输出 "core.autocrlf=false",这意味着命令设置成功。
$ git config --list

如果你的项目底下已经有了 .gitattributes.editorconfig 文件,通常这些文件里面都有放置 CRLF 和 LF 的转换问题的设置项。

这时候你就不必特意执行命令 git config --global core.autocrlf false

3. 编写有规范的提交

我在之前的文章里分享过关于如何设置提交信息规范,请参看《Git提交信息和分支创建规范》

4. 提交历史的压缩

比如你修改一个 bug,假设你通过 3 次提交到你的个人分支才把它改好。这时候你提 Pull Request 就会显示有三个提交。

如果提交历史不进行压缩,这个 PR 被合并到主分支后,以后别人看到你这个 bug 的修复就是去这三个 commits 里去一一查看,进行对比,才能知道到底修改了什么。

压缩提交历史就是将三次提交压缩成一次提交。

可以通过 git rebase 命令进行 commit 的压缩,比如将最近三次提交压缩成一次可以执行

git rebase -i HEAD~3

5. 删除已经 merge 的分支

有些 SCM,比如 Bitbucket 不支持默认勾选 Delete source branch after merging,这个问题终于在 Bitbucket 7.3 版本修复了。详见 BSERV-9254BSERV-3272 (2013年创建的)。

注意在合并代码时勾选删除源分支这一选项,否则会造成大量的开发分支留在 Git 仓库下。


如果还需要哪些设置这里没有提到的,欢迎补充。