2023 年终总结

时间过得很快,2023 年转瞬即逝。如果不记录下自己在这一年里发生的事情,过不了多久就很难回想起来这一年都发生过什么。

因此按照惯例还是要先回顾 2023 年,然后展望 2024 年。

回顾 2023

回顾这一年,我想用三个关键词来形容生活、工作以及业余。

生活中,是“奶爸”

从孩子一出生就是我和我的队友独立带娃,白天我上班,她带娃;晚上下班我火速回去接班、陪玩、家务直到孩子睡觉。周末至少有一天会带孩子出去溜达。

带娃的过程中会觉得辛苦,漫长,然而回顾这一年会发现孩子一眨眼就长大了。年初时候还只会爬、扶站;到了年末孩子已经能爬桌子能跑了,有消耗不完的能量。

接下来就是流水账的记录了,记录一下平凡一年中的小事件:

  • 四月:跟公司活动去了一趟发现王国、爬了童牛岭、玩了三国杀、在渔公码头吃了海鲜自助
  • 五月:在星海和庄河分别给孩子办了生日宴
  • 九月:第一次带娃住酒店,去了金石滩希尔顿住了一晚、吃了一顿酒店自助早餐
  • 十月:国庆回庄河住了一晚,吃了一顿家庭烧烤;回来去了一趟横山寺,吃了一顿自助素食餐;假期踢了一场球;办了大连森林动物园的卡开始打卡动物园
  • 十一月:去了大连森林动物园、旅顺太阳沟、大连自然博物馆、参加了公司在钱库里的聚餐
  • 十二月:收到非常突发的消息(以后有机会再细说)、参加组内团建、大连博物馆、陪爸爸住院检查、逛旅顺博物馆

工作中,是“最佳实践”的坚守着

这一年我依旧坚持 DevOps 最佳实践:

  1. 继续拓展 Ansible Playbook 仓库的应用范围
  2. 创建了 Infrastructure as Code 仓库,用 Code 来管理 Infra
  3. 创建了 Docker Image 仓库来容器化产品,在 Bitbucket 仓库中应用了很多我的 DevOps 实践
  4. 承担了更多产品的 Build 和 Release 工作
  5. 提出并实施了 Software Supply Chain Security 想法
  6. 在团队内部分享 DevOps 实践,以 Jenkins 共享库的形式分享给其他团队

业余时间,是“开源和写作”的爱好者

和去年一样,业余时间我还做同样的事情:

  1. 开源项目
  • cpp-linter-action 截至目前已经有 400 多个用户在使用,包括微软、Jupyter、Waybar、libvips、desktop、chocolate-doom 等知名开源项目,希望之后还有更多的想法去改进
  • commit-check 目前处在初期发展阶段,目前的用户很少,还需要优化它以及引入更多好的想法
  1. 写作 - 2023 年我一共更新了 20 篇博客 + 6 篇公众号文章,距离年初设定的 24(博客)+ 12(公众号)打了一些折扣
  2. 学习 - 加入的知名社区里学习和贡献这件事没有做到,有了孩子之后确实没有多少业余时间了,希望 2024 娃能早睡我能有更多自己的时间

展望 2024

每年的愿望或是 Flag 还是要设置的,万一实现了呢?

  1. 希望能顺利的度过职业发展期,希望会是一个崭新的、充满挑战的开始
  2. 家人身体健康,工作和家庭的平衡,带她们多出去走走
  3. 补足在 DevOps 一些方面的不足,争取参与到实际的项目中来获得提升
  4. 以教促学,持续在博客、公众号等分享,坚持个人成长
  5. 保持运动,不论是跑步还是踢球,把体重降下来

过去的年终总结

2022 年终总结
2020 年终总结
2019 年终总结
2018 从测试转开发


转载本站文章请注明作者和出处,请勿用于任何商业用途。欢迎关注公众号「DevOps攻城狮」

如何把 GitHub Release Notes 按照 New features、Bug Fixes ... 进行自动分类

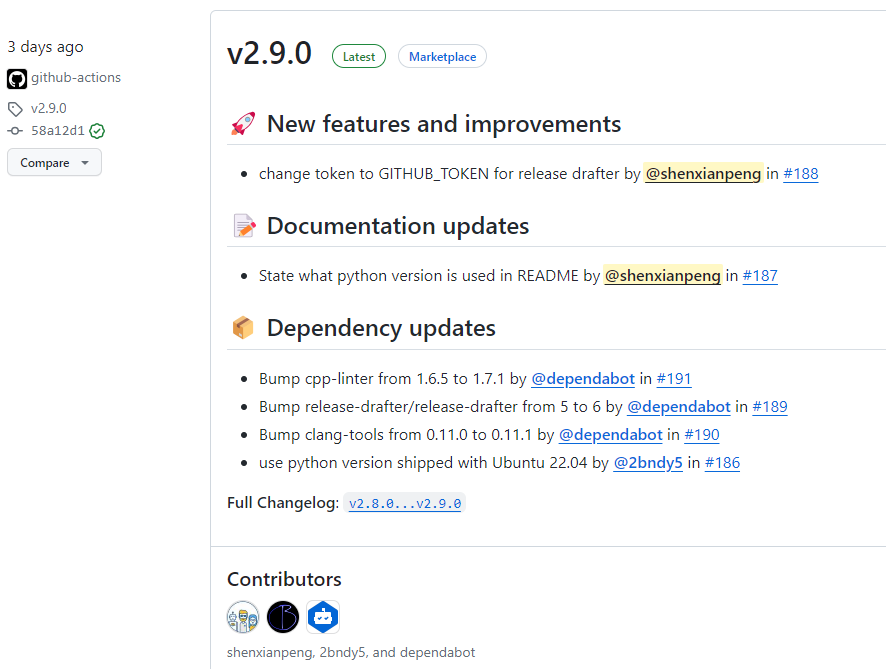
如果你使用过 GitHub 发布过项目,你会知道 GitHub 可以自动生成 Release Notes

就像这样 GitHub 自动生成的 Release Notes。

Example 1

这个截图里的 Release Notes 内容很少,看起来还很清晰。但如果内容很多,以 Jenkinsci 组织下的 configuration-as-code-plugin 项目为例,可以看出来这里的 Release Notes 中的内容是按照标题进行分类的,假如这些内容混在一起将会非常糟糕的体验。(不要误以为这是手动进行分类的,程序员才不愿意干这种事😅)

Example 2

本文将分享针对需要对 GitHub Release Notes 的内容按照标题进行自动分类的两种方式。

方式一:使用 GitHub 官方提供的功能

方式一是通过 GitHub 提供的功能对 Release Notes 进行自动分类,即在仓库下面创建配置文件 .github/release.yml。这个功能与 GitHub 的 Issue Template 和 Pull Request Template 类似。具体的配置选项可以参考官方文档

以下我是在 commit-check-action 项目的配置

changelog:
exclude:
labels:
- ignore-for-release
categories:
- title: '🔥 Breaking Changes'
labels:
- 'breaking'
- title: 🏕 Features
labels:
- 'enhancement'
- title: '🐛 Bug Fixes'
labels:
- 'bug'
- title: '👋 Deprecated'
labels:
- 'deprecation'
- title: 📦 Dependencies
labels:
- dependencies
- title: Other Changes
labels:
- "*"

针对上面的示例,在添加了 .github/release.yml 配置文件之后,当再次生成 Release Notes 时就会自动将其内容进行自动归类(下图中的标题 📦 Dependencies 是自动添加的)

Example 3

方式二:使用 Release Drafter

方式二是使用 Release Drafter,即在仓库创建配置文件 .github/release-drafter.yml

从 Release Drafter 项目提供的配置参数可以看出来它提供的功能更多,使用也更加复杂。另外它还支持将配置文件放到组织下的中央仓库 .github 来实现统一的配置、并将其共享给其他仓库。

目前方式一 .github/release.yml 不支持通过中央仓库 .github 来实现统一的配置,详见这个讨论

这里还以 jenkinsci/configuration-as-code-plugin 为例看到它的 .github/release-drafter.yml 的配置。

_extends: .github

这个配置的 _extends: .github 表示从中央仓库 .github/.github/release-drafter.yml 继承过来的配置。

# Configuration for Release Drafter: https://github.com/toolmantim/release-drafter
name-template: $NEXT_MINOR_VERSION
tag-template: $NEXT_MINOR_VERSION
# Uses a more common 2-digit versioning in Jenkins plugins. Can be replaced by semver: $MAJOR.$MINOR.$PATCH
version-template: $MAJOR.$MINOR

# Emoji reference: https://gitmoji.carloscuesta.me/
# If adding categories, please also update: https://github.com/jenkins-infra/jenkins-maven-cd-action/blob/master/action.yaml#L16
categories:
- title: 💥 Breaking changes
labels:
- breaking
- title: 🚨 Removed
labels:
- removed
- title: 🎉 Major features and improvements
labels:
- major-enhancement
- major-rfe
- title: 🐛 Major bug fixes
labels:
- major-bug
- title: ⚠️ Deprecated
labels:
- deprecated
- title: 🚀 New features and improvements
labels:
- enhancement
- feature
- rfe
- title: 🐛 Bug fixes
labels:
- bug
- fix
- bugfix
- regression
- regression-fix
- title: 🌐 Localization and translation
labels:
- localization
- title: 👷 Changes for plugin developers
labels:
- developer
- title: 📝 Documentation updates
labels:
- documentation
- title: 👻 Maintenance
labels:
- chore
- internal
- maintenance
- title: 🚦 Tests
labels:
- test
- tests
- title: Other changes
# Default label used by Dependabot
- title: 📦 Dependency updates
labels:
- dependencies
collapse-after: 15
exclude-labels:
- reverted
- no-changelog
- skip-changelog
- invalid

template: |
<!-- Optional: add a release summary here -->
$CHANGES

replacers:
- search: '/\[*JENKINS-(\d+)\]*\s*-*\s*/g'
replace: '[JENKINS-$1](https://issues.jenkins.io/browse/JENKINS-$1) - '
- search: '/\[*HELPDESK-(\d+)\]*\s*-*\s*/g'
replace: '[HELPDESK-$1](https://github.com/jenkins-infra/helpdesk/issues/$1) - '
# TODO(oleg_nenashev): Find a better way to reference issues
- search: '/\[*SECURITY-(\d+)\]*\s*-*\s*/g'
replace: '[SECURITY-$1](https://jenkins.io/security/advisories/) - '
- search: '/\[*JEP-(\d+)\]*\s*-*\s*/g'
replace: '[JEP-$1](https://github.com/jenkinsci/jep/tree/master/jep/$1) - '
- search: '/CVE-(\d{4})-(\d+)/g'
replace: 'https://cve.mitre.org/cgi-bin/cvename.cgi?name=CVE-$1-$2'
- search: 'JFR'
replace: 'Jenkinsfile Runner'
- search: 'CWP'
replace: 'Custom WAR Packager'
- search: '@dependabot-preview'
replace: '@dependabot'

autolabeler:
- label: 'documentation'
files:
- '*.md'
branch:
- '/docs{0,1}\/.+/'
- label: 'bug'
branch:
- '/fix\/.+/'
title:
- '/fix/i'
- label: 'enhancement'
branch:
- '/feature\/.+/'
body:
- '/JENKINS-[0-9]{1,4}/'

以上是中央仓库的 .github/.github/release-drafter.yml 配置,可以看到 Jenkins 官方使用了很多特性,比如模板、替换、自动加 label 等,需要在通读 Release Drafter 的文档之后能更好的理解和使用。

总结

以上两种方式都可以帮助你在自动生成 Release Notes 的时候自动进行标题分类,但两者有一些如下差别,了解它们可以帮助你更好的进行选择。

  1. GitHub 官方提供的方式更容易理解和配置,可以满足绝大多数的项目需求。主要的不足是不支持从中央仓库 .github 中读取 .github/release.yml
  2. Release Drafter 提供了更为强大的功能,比如模板、排序、替换、自动对 pull request 加 label 等等,尤其是可以通过中央仓库来设置一个模板,其他项目来继承其配置。

如果是大型的开源组织,Release Drafter 是更好的选择,因为它提供了强大的功能以及支持继承中央仓库配置。如果是个人项目,GitHub 官方提供的方式基本满足需求。

以上就是我对两个生成 GitHub Release Notes 并进行自动分类的分享。

如果有任何疑问或建议欢迎在评论区留言。


转载本站文章请注明作者和出处,请勿用于任何商业用途。欢迎关注公众号「DevOps攻城狮」

How to make Jenkins pipeline not fail if a specific error occurs

Sometimes you don’t want Jenkins pipeline failed for a specific error occurs. so you can use catchError to catch error and update stage or build result to SUCCESSFUL or UNSTABLE or FAILURE (if you want)

Catch Error Jenkins pipeline

Here is the Jenkinsfile of pipeline

pipeline {
agent { node { label 'linux' } }

stages {
stage('Catch Error') {
steps {
catchError(buildResult: 'UNSTABLE', stageResult: 'UNSTABLE', message: 'abc: command not found') {
sh "abc"
}
}
}
}
}

Here is the output of pipeline

17:14:07  [Pipeline] Start of Pipeline
17:14:08 [Pipeline] node
17:14:08 Running on linux in /agent/workspace/Stage-Job/catch-error
17:14:08 [Pipeline] {
17:14:08 [Pipeline] stage
17:14:08 [Pipeline] { (Catch Error)
17:14:08 [Pipeline] catchError
17:14:08 [Pipeline] {
17:14:08 [Pipeline] sh
17:14:08 + abc
17:14:08 /agent/workspace/Stage-Job/catch-error@tmp/durable-303b03ca/script.sh: line 1: abc: command not found
17:14:08 [Pipeline] }
17:14:08 ERROR: abc: command not found
17:14:08 ERROR: script returned exit code 127
17:14:08 [Pipeline] // catchError
17:14:08 [Pipeline] }
17:14:08 [Pipeline] // stage
17:14:08 [Pipeline] }
17:14:08 [Pipeline] // node
17:14:08 [Pipeline] End of Pipeline
17:14:08 Finished: UNSTABLE

转载本站文章请注明作者和出处,请勿用于任何商业用途。欢迎关注公众号「DevOps攻城狮」

How to adopt Supply Chain Security for GitHub and Non-GitHub projects

Why Software Supply Chain Security is important?

Software supply chain security is the act of securing the components, activities, and practices involved in creating software.

Attacks in the software supply chain have become more and more frequent in recent years, SonaType reported more than 700% of attacks in open-source software from 2019 to 2022.

SonaType reported

In this Google Security Blog, there are many real examples of software supply chain attacks that pose growing threats to users and Google proposed a solution called SLSA in 2021.

Also, some well-known organizations such as Linux Foundation and CNCF have created standards and tools to address the issue of how to produce trusted software and attestations.

LF & CNCF

Based on this background, many organizations want to incorporate best practices from the open-source community into our CICD pipeline.

How to adopt Supply Chain Security for GitHub and Non-GitHub projects

Next, I will show you how to adopt on both GitHub and Rocket Bitbucket as an example to show you how we integrate software supply chain security

GitHub projects

On GitHub, the easiest and most popular option is to use slsa-github-generator, a tool provided by the official slsa-framework for native GitHub projects to create attestations during the build process and upload signed attestations to Rekor a transparency log system created by Sigstore. Here is the demo reposistory for reference.

Before installing your product package, the user can download the package and verify the provenance file at the end of .intoto.jsonl first, then run the following command manually or in their CI pipeline to verify whether the artifact is tampered with or not

bash-4.4$ slsa-verifier verify-artifact test-1.0.0-py3-none-any.whl --provenance-path test-1.0.0-py3-none-any.whl.intoto.jsonl --source-uri github.com/shenxianpeng/slsa-provenance-demo
Verified signature against tlog entry index 49728014 at URL: https://rekor.sigstore.dev/api/v1/log/entries/24296fb24b8ad77af7063689e8760fd7134f37e17251ec1d5adc16af64cb5cb579493278f7686e77
Verified build using builder "https://github.com/slsa-framework/slsa-github-generator/.github/workflows/generator_generic_slsa3.yml@refs/tags/v1.9.0" at commit fb7f6df9f8565ed6fa01591df2af0c41e5573798
Verifying artifact test-1.0.0-py3-none-any.whl: PASSED

PASSED: Verified SLSA provenance

Non-GitHub projects

However, there are many organizations’ codes are hosted on Non-GitHub SCM, so you can use the Witness, a tool from CNCF in-toto, which can help us generate and verify attestations.

It’s easy to scale Witness to your products, just integrate witness command into the existing build command it will generate proof of the software build and release execution process and can be verified.

You can follow this demo to integrate with witness, then will generate the build package along with attestations file, policy-signed.json file, and a public key.

Before user installing your product package, they can run the following command manually or in their CI pipeline to verify whether the artifact is tampered or not.

witness verify -f dist/witness_demo-1.0.0-py3-none-any.whl -a witness-demo-att.json -p policy-signed.json -k witness-demo-pub.pem
INFO Using config file: .witness.yaml
INFO Verification succeeded
INFO Evidence:
INFO 0: witness-demo-att.json

转载本站文章请注明作者和出处,请勿用于任何商业用途。欢迎关注公众号「DevOps攻城狮」

Witness 和 SLSA 💃

由于近些年针对软件的供应链的攻击越来越频繁,因此 Google 在 2021 提出的解决方案是软件工件供应链级别(Supply chain Levels for Software Artifacts,”SLSA”)

本篇将介绍在非 GitHub 生态系统中,我们如何生成和验证软件工件的来源,从而提高你的项目的 SLSA Level。

Witness 是一个可插拔的软件供应链风险管理框架,它能自动、规范和验证软件工件出处。它是 in-toto 是 CNCF 下的项目之一。它的最初作者是 Testifysec,后来捐赠给了 in-toto

什么是 Witness

Witness 是一个可插拔的供应链安全框架,可创建整个软件开发生命周期(SDLC)的证据(Provenance)跟踪,确保软件从源代码到目标的完整性。它支持大多数主要的 CI 和基础架构提供商,是确保软件供应链安全的多功能、灵活的解决方案。

安全 PKI (Public Key Infrastructure - 公钥基础设施)分发系统的使用和验证 Witness 元数据的能力进一步增强了流程的安全性,并有助于减少许多软件供应链攻击向量。

Witness 的工作原理是封装在持续集成流程中执行的命令,为软件开发生命周期(SDLC)中的每个操作提供证据跟踪,这样就可以详细、可验证地记录软件是如何构建的、由谁构建以及使用了哪些工具。

这些证据可用于评估政策合规性,检测任何潜在的篡改或恶意活动,并确保只有授权用户或机器才能完成流程中的某一步骤。

总结 - Witness 可以做什么

  • 验证软件由谁构建、如何构建以及使用了哪些工具
  • 检测任何潜在的篡改或恶意活动
  • 确保只有经授权的用户或机器才能完成流程的每一步
  • 分发证词(Attestations)和策略(Policy)

如何使用 Witness

主要分三步:

  1. witness run - 运行提供的命令并记录有关执行的证词。
  2. witness sign - 使用提供的密钥签署提供的文件。
  3. witness verify - 验证 witness 策略。

快速开始

这是我创建的 Witness Demo 仓库用于演示 witness 的工作流程,具体可以根据如下步骤进行。

Read More

Python 和 SLSA 💃

由于近些年针对软件的供应链的攻击越来越频繁,据 SonaType 的统计从 2019 年到 2022 年针对开源软件的攻击增长了 742%,因此 2021 年 Google 提出的解决方案是软件工件供应链级别(Supply chain Levels for Software Artifacts,”SLSA”)

Software supply chain attacks

本篇将介绍在 Python 生态系统中,我们如何使用 SLSA 框架来生成和验证 Python 工件的来源,从而让你的 SLSA Level 从 L0/L1 到 L3。

注意:本文介绍的是针对托管在 GitHub 上的 Python 项目。SLSA 框架可通过 GitHub Actions 来实现开箱即用,只需较少的配置即可完成。

对于托管在非 GitHub 上的项目(例如 Bitbucket)可以尝试 Witness,下一篇我将更新关于如何使用 Witness。

内容

  1. 构建纯净的Python包
  2. 生成出处证明
  3. 上传到PyPI
  4. 验证Python包的来源
  5. 文中用到的项目

下面是从维护人员到用户的端到端工作流程:从构建 Wheel package -> 生成出处 -> 验证出处 -> 发布到 PyPI -> 以及用户验证出处 -> 安装 wheel。接下来让我们一起来完成这其中的每一步。

如果你想了解 Python 打包的流程或是术语可以参见Python 打包用户指南

端到端流程

Read More

Problems and solutions when upgrading XLC from 10.1 to IBM Open XL C/C++ for AIX 17.1.0

In this article, I would like to document the problems encountered when upgrading from IBM XLC 10.1 to XLC 17.1 (IBM Open XL C/C++ for AIX 17.1.0) and how to fix the following 12 errors.

If you’ve encountered any other errors, feel free to share your comments with or without a solution.

1. Change cc to ibm-clang

First you need to change all the related cc to ibm-clang in the the global Makefile. for example:

- CC=cc
- CXX=xlC_r
- XCC=xlC_r
- MAKE_SHARED=xlC_r
+ CC=ibm-clang
+ CXX=ibm-clang_r
+ XCC=ibm-clang_r
+ MAKE_SHARED=ibm-clang_r

And check following link of Mapping of options to map new Clang options if any.

2. error: unknown argument: ‘-qmakedep=gcc’

- GEN_DEPENDENTS_OPTIONS=-qmakedep=gcc  -E -MF $@.1 > /dev/null
+ GEN_DEPENDENTS_OPTIONS= -E -MF $@.1 > /dev/null

3. should not return a value [-Wreturn-type]

- return -1;
+ return;

4. error: non-void function ‘main’ should return a value [-Wreturn-type]

- return;
+ return 0;

5. error: unsupported option ‘-G’ for target ‘powerpc64-ibm-aix7.3.0.0’

- LIB_101_FLAGS := -G
+ LIB_101_FLAGS := -shared -Wl,-G

6. Undefined symbol (libxxxx.so)

- LIB_10_FLAGS := -bexport:$(SRC)/makefiles/xxxx.def
+ LIB_10_FLAGS := -lstdc++ -lm -bexport:$(SRC)/makefiles/xxxx.def

7. unsupported option -qlongdouble

- drv_connect.c.CC_OPTIONS=$(CFLAGS) -qlongdouble -brtl
+ drv_loadfunc.c.CC_OPTIONS=$(CFLAGS) $(IDIR) -brtl

8. Undefined symbol: ._Z8u9_closei

- extern int u9_close(int fd) ;
+ extern "C" int u9_close(int fd) ;

9. ERROR: Undefined symbol: .pow

- CXXLIBES = -lpthread -lC -lstdc++
+ CXXLIBES = -lpthread -lC -lstdc++ -lm

10. ‘main’ (argument array) must be of type ‘char **’

- d_char *argv[];
+ char *argv[];

11. first parameter of ‘main’ (argument count) must be of type ‘int’

- int main(char *argc, char *argv[])
+ int main(int argc, char *argv[])

12. ERROR: Undefined symbol: ._ZdaPv

- LIB_3_LIBS	:= -lverse -llog_nosig
+ LIB_3_LIBS := -lverse -llog_nosig -lstdc++

转载本站文章请注明作者和出处,请勿用于任何商业用途。欢迎关注公众号「DevOps攻城狮」

2022-23 世界质量报告(World Quality Report)

2202-23 世界质量报告(World Quality Report 简称 WQR)是一项全球研究,不论是作为软件测试、开发工程师,关注这类软件质量报告可以帮助我们快速了解软件行业的现状和趋势。

七个主题

今年的 WQR 的关键趋势和推荐包括包括以下七个关键建议:

  • 敏捷质量调配 (DONE)
  • 质量自动化 (DONE)
  • 测试基础设施测试和配置 (DONE)
  • 测试数据提供和数据验证 (WIP)
  • 质量和可持续的 IT (NOT START)
  • 新兴技术趋势的质量工程 (NOT START)
  • 价值流管理 (NOT START)

Read More

解决通过 Jenkins Artifactory plugin 上传 artifacts 失败的问题 “unable to find valid certification path to requested target”

最近遇到了通过 Jenkins agent 无法上传 artifacts 到 Artifactory 的情况,具体错误如下:

[2023-09-11T08:21:53.385Z] Executing command: /bin/sh -c git log --pretty=format:%s -1
[2023-09-11T08:21:54.250Z] [consumer_0] Deploying artifact: https://artifactory.mycompany.com/artifactory/generic-int-den/my-project/hotfix/1.2.0.HF5/3/pj120_bin_opt_SunOS_3792bcf.tar.Z

[2023-09-11T08:21:54.269Z] Error occurred for request GET /artifactory/api/system/version HTTP/1.1: sun.security.validator.ValidatorException: PKIX path building failed: sun.security.provider.certpath.SunCertPathBuilderException: unable to find valid certification path to requested target.
[2023-09-11T08:21:54.282Z] Error occurred for request PUT /artifactory/generic-int-den/my-project/hotfix/1.2.0.HF5/3/pj120_bin_opt_SunOS_3792bcf.tar.Z;build.timestamp=1694418199972;build.name=hotfix%2F1.2.0.HF5;build.number=3 HTTP/1.1: sun.security.validator.ValidatorException: PKIX path building failed: sun.security.provider.certpath.SunCertPathBuilderException: unable to find valid certification path to requested target.
[2023-09-11T08:21:54.284Z] [consumer_0] An exception occurred during execution:
[2023-09-11T08:21:54.284Z] java.lang.RuntimeException: javax.net.ssl.SSLHandshakeException: sun.security.validator.ValidatorException: PKIX path building failed: sun.security.provider.certpath.SunCertPathBuilderException: unable to find valid certification path to requested target
[2023-09-11T08:21:54.284Z] at org.jfrog.build.extractor.clientConfiguration.util.spec.SpecDeploymentConsumer.consumerRun(SpecDeploymentConsumer.java:44)
[2023-09-11T08:21:54.284Z] at org.jfrog.build.extractor.producerConsumer.ConsumerRunnableBase.run(ConsumerRunnableBase.java:11)
[2023-09-11T08:21:54.284Z] at java.lang.Thread.run(Thread.java:745)
[2023-09-11T08:21:54.285Z] Caused by: javax.net.ssl.SSLHandshakeException: sun.security.validator.ValidatorException: PKIX path building failed: sun.security.provider.certpath.SunCertPathBuilderException: unable to find valid certification path to requested target

这个问题产生的原因是通过 HTTPS 来上传文件的时候没有通过 Java 的安全认证。解决这个问题的办法就是重新生成认证文件,然后导入即可,具体的步骤如下。

生成安全认证(Security Certificate)文件

步骤如下:

  1. 首先生成通过浏览器打开的你的 Artifactory 网址
  2. 在网址的左侧应该有一个锁的图标,点击 Connection is secure -》Certificate is valid -》Details -》 Export
  3. 选择 DER-encoded binary, single certificate (*.der) 生成认证文件

比如我生成的安全认证文件的名字叫:artifactory.mycompany.der(名字可以任意起,只要后缀名不变即可)

通过命令行导入安全认证

登录到那台有问题的 Solaris agent,上传 artifactory.mycompany.der 到指定目录下,然后找到 cacerts 的路径,执行如下命令:

root@mysolaris:/# keytool -import -alias example -keystore /usr/java/jre/lib/security/cacerts -file /tmp/artifactory.mycompany.der
# 然后选择 yes

这时候会提示你输入密码,默认密码为 changeit,输入即可。然后重启你的 JVM 或是 VM。等再次通过该 Agent 上传 artifacts,一切恢复正常。

可参考: https://stackoverflow.com/questions/21076179/pkix-path-building-failed-and-unable-to-find-valid-certification-path-to-requ


转载本站文章请注明作者和出处,请勿用于任何商业用途。欢迎关注公众号「DevOps攻城狮」

解决在 AIX 通过 Jenkins agent git clone 失败的问题

最近又遇到了在 AIX 上通过 Jenkins agent 无法下载代码的情况,报了如下错误:

16:42:47  Caused by: hudson.plugins.git.GitException: Command "git init /disk1/agent/workspace/e_feature-aix-ci-build" returned status code 255:
16:42:47 stdout:
16:42:47 stderr: exec(): 0509-036 Cannot load program git because of the following errors:
16:42:47 0509-150 Dependent module /usr/lib/libiconv.a(libiconv.so.2) could not be loaded.
16:42:47 0509-152 Member libiconv.so.2 is not found in archive
16:42:47
16:42:47 at org.jenkinsci.plugins.gitclient.CliGitAPIImpl.launchCommandIn(CliGitAPIImpl.java:2734)
16:42:47 at org.jenkinsci.plugins.gitclient.CliGitAPIImpl.launchCommandIn(CliGitAPIImpl.java:2660)
16:42:47 at org.jenkinsci.plugins.gitclient.CliGitAPIImpl.launchCommandIn(CliGitAPIImpl.java:2656)
16:42:47 at org.jenkinsci.plugins.gitclient.CliGitAPIImpl.launchCommand(CliGitAPIImpl.java:1981)
16:42:47 at org.jenkinsci.plugins.gitclient.CliGitAPIImpl$5.execute(CliGitAPIImpl.java:1047)

上次遇到在 AIX 遇到的 git clone 问题总结在这里 https://shenxianpeng.github.io/2021/06/git-clone-failed-on-aix/

而我在 AIX 机器上手动执行 git clone 命令却没有这个错误发生,从失败的 log 和 ldd /usr/bin/git 发现 libiconv.a 的路径不同,推测问题应该出在 LIBPATH 环境变量上。

因为在本地(AIX)执行 git 命令的时候 LIBPATH 是为空,如果设置了 LIBPATH 路径为 /usr/lib/ 会出上面一样的错误。

$ ldd /usr/bin/git
/usr/bin/git needs:
/usr/lib/libc.a(shr_64.o)
/usr/lib/libpthreads.a(shr_xpg5_64.o)
/opt/freeware/lib/libintl.a(libintl.so.8)
/opt/freeware/lib/libiconv.a(libiconv.so.2)
/opt/freeware/lib/libz.a(libz.so.1)
/unix
/usr/lib/libcrypt.a(shr_64.o)
/opt/freeware/lib64/libgcc_s.a(shr.o)
$

但 Jenkins agent 在执行的时候有默认的 LIBPATH,查看这个变量可以通过 Jenkins Agent 上的 Script Console 执行如下命令打印出来

println System.getenv("LIBPATH")
# 返回的结果
/usr/java8_64/jre/lib/ppc64/j9vm:/usr/java8_64/jre/lib/ppc64:/usr/java8_64/jre/../lib/ppc64:/usr/java8_64/jre/lib/icc:/usr/lib

其中果然有 /usr/lib,这导致了 git 是去找 /usr/lib/libiconv.a 而不是 /opt/freeware/lib/libiconv.a

我尝试过很多种办法但最终还是无法在 Jenkins agent 在 git clone 的时候 unset LIBPATH,包括:

  1. 重新 link,将 /usr/lib/libiconv.a 链接到 /opt/freeware/lib/libiconv.a
mv /usr/lib/libiconv.a /usr/lib/libiconv.a.bak
ln -s /opt/freeware/lib/libiconv.a /usr/lib/libiconv.a
  1. 在 pipeline 中使用 withEnv 设置 LIBPATH 为空
withEnv(['LIBPATH=\'\'']) {
checkout scm
}
  1. 在 Agent 配置页面上尝试通过 Environment variables 来修改 LIBPATH(这个看起来像是 Jenkins 的一个 bug JENKINS-69821)

  2. 在配置 Jenkins agent 页面通过添加 export LIBPATH="" && 到 Prefix Start Agent Command 均不起作用。

最后是通过在 AIX 更新 Git 从版本 2.39.3 升级到 2.40.0 解决了这个错误,这有点巧合并没有真正把 Jenkins agent 的覆盖默认环境变量的问题给解决,但好在这个问题已经没有了。

仅此记录一下,防止以后遇到同样的错误不至于从头开始尝试,也希望这个记录也可能帮助到你。


转载本站文章请注明作者和出处,请勿用于任何商业用途。欢迎关注公众号「DevOps攻城狮」